Free Consult
If you’re wondering what the process of getting braces looks like, you’re not alone. One of the most common questions we hear is:
“What are the steps of getting braces?”
Below, Dr. Sacks explains exactly what happens — from your first consultation to the day your braces are placed.
The first step of getting braces is a comprehensive exam and records appointment. Before any brackets are placed, we gather detailed information to create a customized treatment plan.
During this visit, we take:
Dr. Sacks reviews these records carefully to diagnose your orthodontic needs and determine the most appropriate treatment. At this stage, we decide which type of orthodontic appliance is best for you — whether that’s traditional braces, LightForce braces, or another option.
While the overall process of getting braces is similar for most patients, the way brackets are placed can differ depending on the system used.
Not all braces are applied the same way. At Sacks Orthodontics, we use both direct bonding and indirect bonding methods.
With direct bonding, Dr. Sacks places each bracket manually, one by one, directly onto your teeth. This traditional method allows for precise, hands-on placement.
With indirect bonding, the brackets are digitally positioned by Dr. Sacks in advance using specialized software. Custom 3D-printed transfer trays (sometimes called jigs) are created to fit precisely over your teeth. These trays allow multiple brackets to be placed simultaneously in their pre-planned positions.
Dr. Sacks primarily uses LightForce braces, which combine digital treatment planning with custom 3D-printed brackets designed specifically for your teeth. This digital workflow improves accuracy and efficiency during placement.
Now let’s walk through the actual steps of getting braces on the day of your appointment.
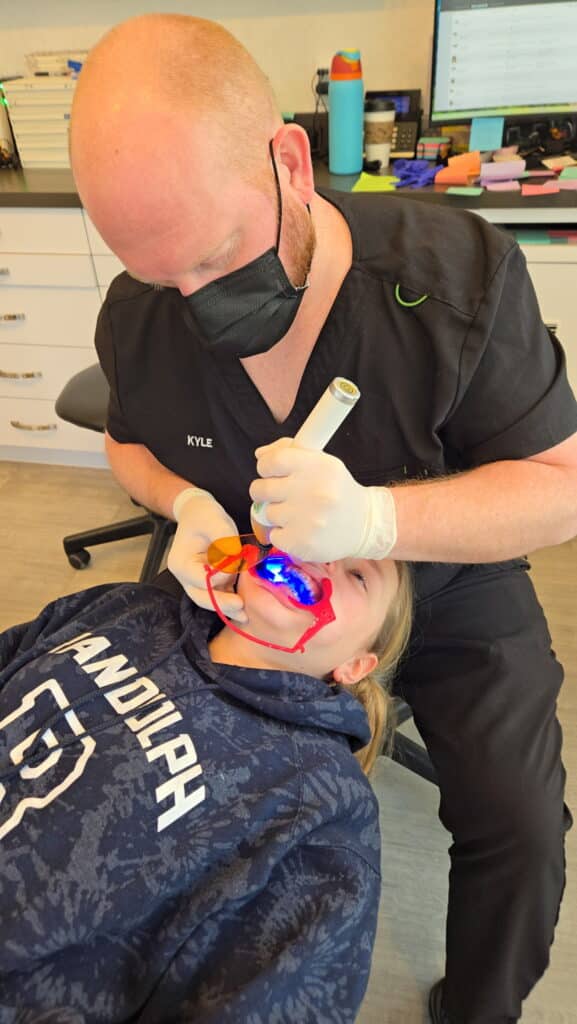
A cheek retractor is placed in your mouth to gently hold your lips, cheeks, and tongue away from your teeth. This gives us a clear view and keeps the teeth completely dry.
Staying dry is critical in the process of getting braces. If moisture gets on the teeth during bonding, the brackets won’t adhere properly.
Your teeth are thoroughly cleaned and then treated with a special solution that prepares the enamel surface. This step helps ensure a strong bond between your teeth and the brackets.
A bonding agent is painted onto each tooth. Think of this as a primer that allows the brackets to securely attach to the enamel.
This is where the bonding method matters.
Both methods are precise — the difference lies in how the brackets are positioned and delivered to the teeth.
Once the brackets are in place, a special curing light (a UV light) is used to harden the bonding material. This secures the brackets firmly to your teeth.
After the brackets are attached, an archwire is threaded through them. Small elastic ties hold the wire in place — and this is where you get to choose your colors.
Once the wire is secured, your braces are officially on and working.
The appointment to place braces typically takes one to two hours, depending on whether you’re receiving direct bonding or indirect bonding with LightForce.
The full orthodontic treatment process, however, usually lasts 12 to 24 months, depending on your specific case and treatment goals.
It’s normal for your teeth to feel slightly sore for a few days after placement. This simply means your braces are beginning to move your teeth.
You’ll receive detailed instructions on:
Most patients adjust quickly within the first week.
Understanding the process of getting braces helps eliminate uncertainty and makes your first appointment feel much more straightforward.
If you’re ready to take the first step, schedule your consultation with Sacks Orthodontics today. Dr. Sacks will evaluate your smile and walk you through every step of the treatment process.